How to Use Natural Light for Stunning Portrait Photography
Natural light remains one of the most accessible and versatile sources for portrait photography. Unlike studio strobes or speedlights, daylight shifts in color temperature, intensity, and direction throughout the day, offering a wide range of creative possibilities. Understanding how to observe and work with these changes allows photographers to produce images with a soft, organic feel that artificial light often struggles to replicate.
This article explores several practical approaches for using natural light effectively in portrait settings. The focus is on positioning subjects near windows, making the most of the golden hour, and diffusing harsh sunlight to achieve a flattering, soft look. Each technique is presented as a method to consider rather than a guaranteed solution, as results depend on specific environmental conditions and the photographer’s artistic intent.
Understanding the Qualities of Natural Light
Before applying specific techniques, it helps to recognize the fundamental characteristics of natural light that influence a portrait. The two primary qualities are hardness and direction. Hard light, such as direct sunlight at midday, creates strong shadows and high contrast. Soft light, such as light filtered through clouds or a north-facing window, produces gradual transitions between highlights and shadows, often considered more flattering for skin tones.
Direction also plays a significant role. Light coming from the side emphasizes texture and depth, while front light minimizes shadows and can flatten features. Backlight, where the subject is between the camera and the light source, can create a rim of illumination that separates the subject from the background. Observing these qualities in real time helps a photographer decide which setup best suits the mood and story of the portrait.
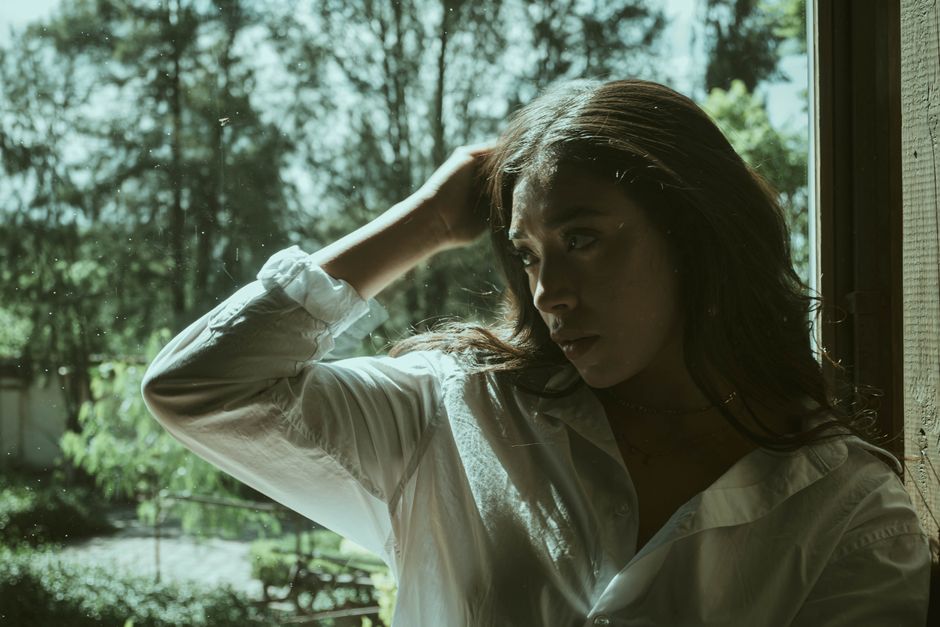
Window Light: Positioning and Angles
Windows are one of the most convenient sources of controlled natural light indoors. The size of the window, its orientation, and the time of day all affect the quality of light that reaches the subject. A large window with indirect light tends to act like a softbox, wrapping light around the subject’s face. Positioning the subject at a 45-degree angle to the window often produces a classic Rembrandt lighting pattern, with a small triangle of light on the shadow side of the face.
Adjusting the distance from the window changes the contrast. Moving the subject closer to the window increases the ratio of light to shadow, while stepping back softens the effect. For portraits with softer shadows, the subject can face the window directly, though this tends to reduce dimensionality. Experimenting with the angle of the chin, the tilt of the head, and the position of the camera relative to the window gives the photographer multiple looks without moving the light source itself.
It is also worth considering the color of the window light. Morning and late afternoon light often has a warm tint, while light from a north-facing window in the northern hemisphere remains relatively neutral throughout the day. When mixed with artificial room lighting, white balance can shift, so setting a custom white balance or shooting in raw format allows for correction during post-processing.
The Golden Hour: Timing and Techniques
The golden hour refers to the period shortly after sunrise and before sunset when the sun is low in the sky. At this time, sunlight travels through a thicker layer of atmosphere, scattering shorter blue wavelengths and leaving longer, warm tones of red and orange. This light is naturally diffused and casts long, soft shadows, making it highly desirable for portrait work.
Working with the golden hour requires careful planning. The exact duration varies by latitude and season, but it typically lasts between thirty minutes and an hour. Positioning the subject so that the sun is behind them can create a warm backlight effect, with the subject’s edges glowing. To avoid silhouetting the face, a reflector or a fill light can bounce some sunlight back onto the subject. Alternatively, the subject can turn so that the sun lights them from the side, emphasizing facial contours without harsh highlights.
As the sun continues to sink, the light becomes even softer and more directional. Photographers often work quickly during this window because the light changes noticeably every few minutes. Taking test shots and adjusting exposure settings frequently helps maintain consistency in the overall tone of the series. When the sky is partly cloudy, the golden hour effect can become even more dramatic as clouds catch warm light and act as natural diffusers.
Diffusing Harsh Sunlight: Tools and Methods
Midday or bright sunlight can create unflattering harsh shadows and blown highlights on a subject’s face. Diffusing this light softens it and reduces contrast. A simple diffuser panel, often made of translucent fabric stretched over a collapsible frame, can be placed between the sun and the subject. This scatters the direct rays, turning the light source into a larger, softer area of illumination.
When a diffuser is not available, finding natural diffusers is an alternative. Shooting under the edge of a building, beneath a tree canopy, or next to a white wall can provide similar softening effects. Cloud cover acts as a massive natural diffuser, so overcast days produce even, shadowless light that many portrait photographers find ideal. While overcast light lacks the drama of directional sun, it is forgiving and works well for close-up portraits where skin texture and expression are the focus.
Another method for managing harsh sunlight is to change the shooting position entirely. Instead of shooting in direct sun, moving the subject into open shade—such as the shadow of a building or a large tree—eliminates the direct source. In open shade, the subject is lit by the blue sky, which can introduce a cool color cast. To counteract this, a warm reflector or careful white balance adjustment can bring the skin tones back to a natural range.
Using Reflectors and Bounce Light
Reflectors are lightweight tools used to redirect existing natural light onto shadow areas of the subject. They come in various colors, each affecting the quality and color of the bounced light. White reflectors produce a neutral, soft fill, while silver reflectors increase intensity and contrast without shifting color. Gold reflectors add warmth, mimicking the tone of golden hour light.
Positioning a reflector is a matter of angle and distance. Placing it opposite the main light source, at waist or chest height, often fills shadows under the chin, nose, and eyes. Moving the reflector closer increases the fill effect, while moving it farther reduces it. For outdoor portraits, using a reflector with direct sunlight can also help reduce the dynamic range between highlights and shadows, making it easier to retain detail in both areas.
Not all reflective surfaces need to be purpose-made. White poster boards, foam core, or even a light-colored wall can serve as bounce surfaces. In a pinch, a white shirt or a folded piece of paper can provide subtle fill. The key is to observe where the natural light is falling and to position a reflector so that it catches some of that light and redirects it precisely onto the parts of the face that need lifting.
Natural light offers an evolving palette that rewards patience and observation. By understanding its qualities, positioning subjects thoughtfully near windows, taking advantage of the golden hour, diffusing harsh sunlight, and using reflectors to shape the light, a photographer can achieve a wide variety of portrait looks. These methods are not prescriptions but starting points—each shooting environment presents unique variables that influence the final image. Practicing these techniques in different settings builds a deeper intuitive sense of how to work with what the available light provides.